はじめに
先日紹介した自作のVisual Studio Code(以下VSCode)拡張機能の開発時に初めてTypeScriptを用いた拡張機能のテスト環境を構築したのですが、VSCodeの構成もよくわからないままに取り組み、随分苦労したので、今回はそれを解説してみたいと思います。
テストの実行方法の種類
公式には、テストの開発方法は下記にドキュメントがあります。
Testing Extension | Visual Studio Code Extension API
VSCode上で拡張機能をテストするには、コーディングに使用しているVSCodeとは別にVSCodeを立ち上げ、そのVSCode上で拡張機能を叩くテストプログラムを動かします。
この別のVSCodeのことを「インスタンス」と呼びます。
テストプログラム用のVSCodeインスタンスを立ち上げるには、実際にコマンドプロンプトなどからVSCodeを立ち上げる方法もありますが、他にもvscode-testモジュール(以下vscode-test)というnpmパッケージを読み込み、そこから子プロセスでVSCodeインスタンスを生成しテストを行うという方法もあり、今後主流になっていくそうです(下記のリストのうち2-1)。
ただ本稿では、参考にした拡張機能にならって、vscode-testを使わない方法 を解説します。
vscode-testを使わない方法- コマンドプロンプトで「
code ~」のようにVSCodeの実行ファイルを指定して、VSCodeインスタンスを起動する。
もっともオーソドックスな方法です。
ここでいちいちオプションを指定するのが面倒なので、次の1-2の方法があります。 launch.jsonにパラメータを記入して、使用中のVSCodeインスタンスからGUIを操作し、テスト用のVSCodeインスタンスを起動する。
1-1でいちいちコマンドプロンプトで指定しているオプションを、launch.jsonに記述してVSCodeインスタンスを起動することが出来ます。
(本稿で解説します)
- コマンドプロンプトで「
vscode-testを使う方法- NodeのプログラムとしてTypeScriptを記述し実行する。(例:
runTest.ts)
その中でvscode-testのrunTests関数を呼び出す。
(これでVSCodeインスタンスを子プロセスで起動することができます。このrunTest.tsのことを「Test Script」と呼びます。)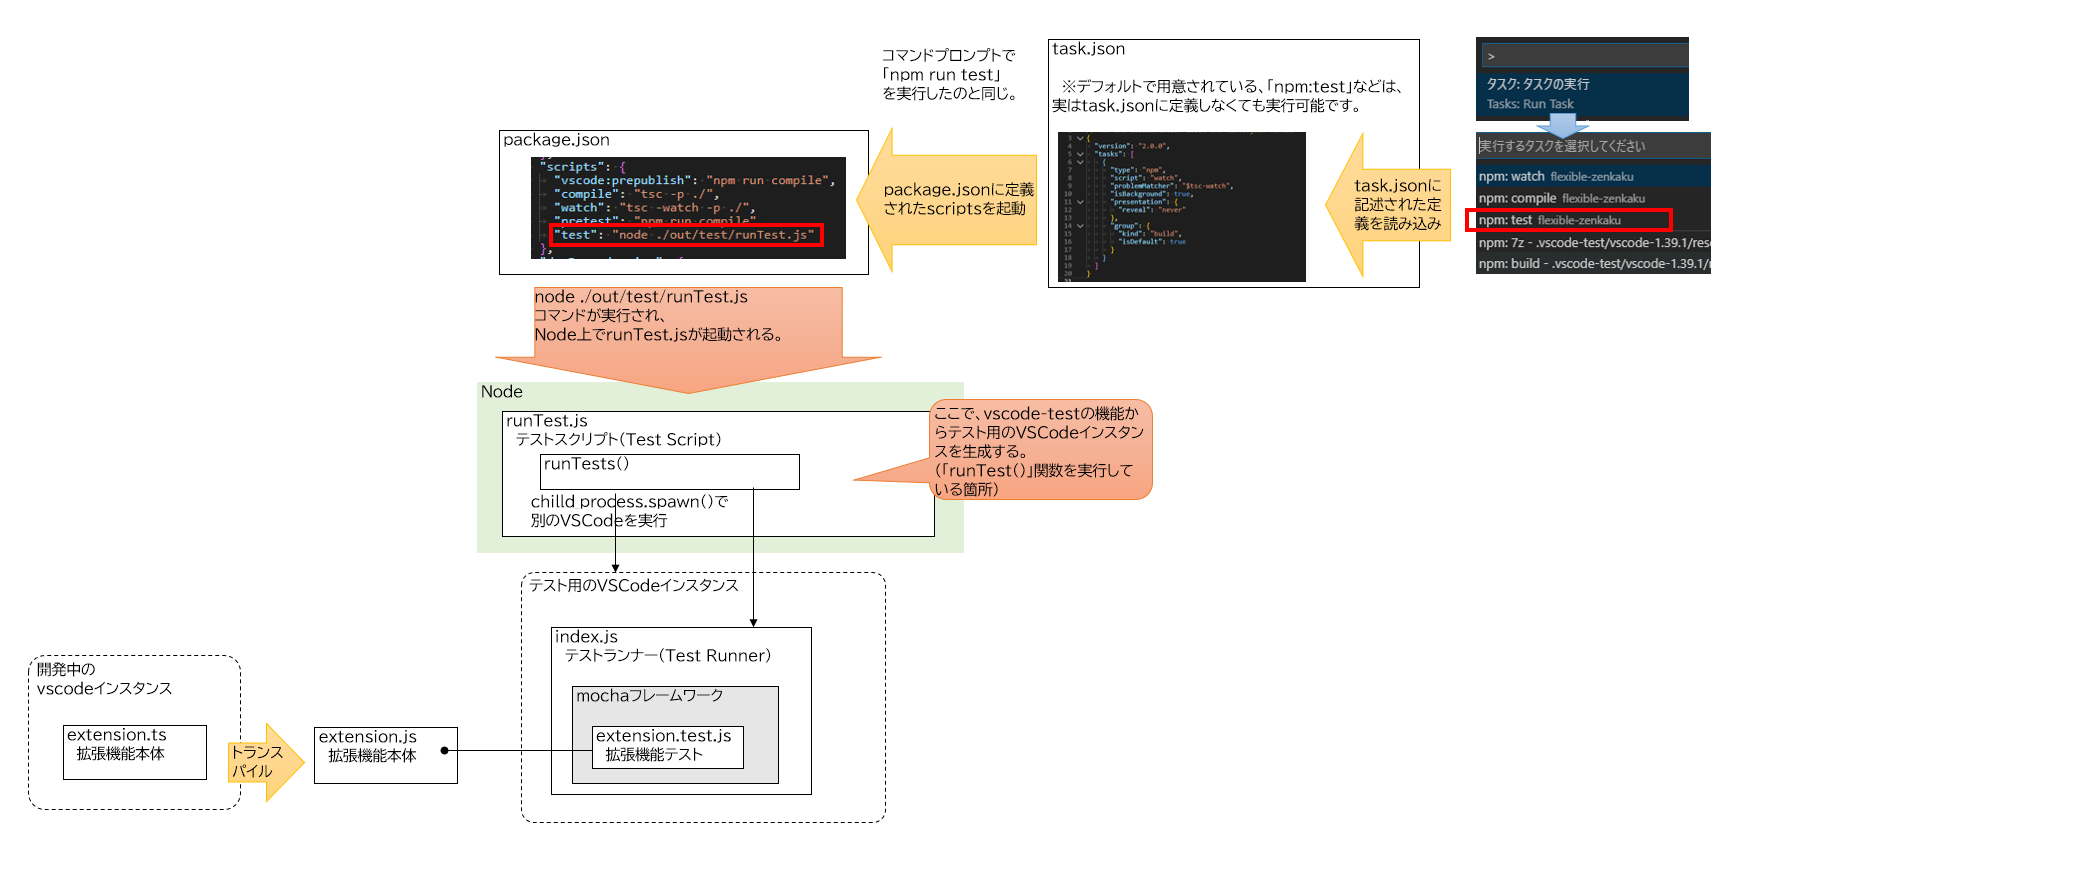
コマンドプロンプトで「node ./out/test/runTest.js」のように、Nodeプログラムとして指定することで起動できます。
ただし、後述しますが色々と制限があります。(参照:runTest.jsでテストするときの注意)
公式ドキュメントでもこの方法を主に解説しています。リモートデバッギングやMicrosoftが運営するAzureDevOps上でCIが回せるようになるのが理由のようです??
Continuous Integration | Visual Studio Code Extension API
- NodeのプログラムとしてTypeScriptを記述し実行する。(例:
テスト環境の構築方法
繰り返しになりますが、本稿では launch.jsonにパラメータを記入して、使用中のVSCodeインスタンスからGUIを操作し、テスト用のVSCodeインスタンスを起動する テスト方法について解説します。
テストプログラムはTypeScriptで記述します。
特にJavaScriptであることを意識しない限りは「TypeScriptプログラム」と称して説明します。
必要なnpmパッケージ
テストを実行するには、開発環境のnode_modulesフォルダ内に、npmパッケージをインストールする必要があります。
| npmパッケージ | 概要 |
|---|---|
| mocha | テストフレームワークのパッケージ |
| istanbul | カバレッジ測定に使用します。 |
| remap-istanbul | カバレッジとTypeScriptファイルとのマッピングに使用します。 |
他にも、BDD用のアサート記法を提供するchaiモジュールなどもありますが、今回は割愛します。(assertモジュールを使います。)
インストール方法
解説に使用する環境は、公式のドキュメントでも解説している、yeomanで生成するテンプレートを使用します。
Your First Extension | Visual Studio Code Extension API
上記サイトの手順に従って、VSCodeの拡張機能のテンプレートを生成します。
具体的には、下記の手順になります。
コマンドプロンプトで下記を実行。
yoその後は対話形式で生成するテンプレートの内容を聞かれるので適当に入力します。
What would you like to do?→「code」を選択
What type of extension do you want to create?→「New Extension (TypeScript)」を選択
What's the name of your extension? →「sample」を入力
What's the identifier of your extension? (sample) →そのままEnter
What's the description of your extension?→そのままEnter
Initialize a git repository? (Y/n)→「Y」を入力
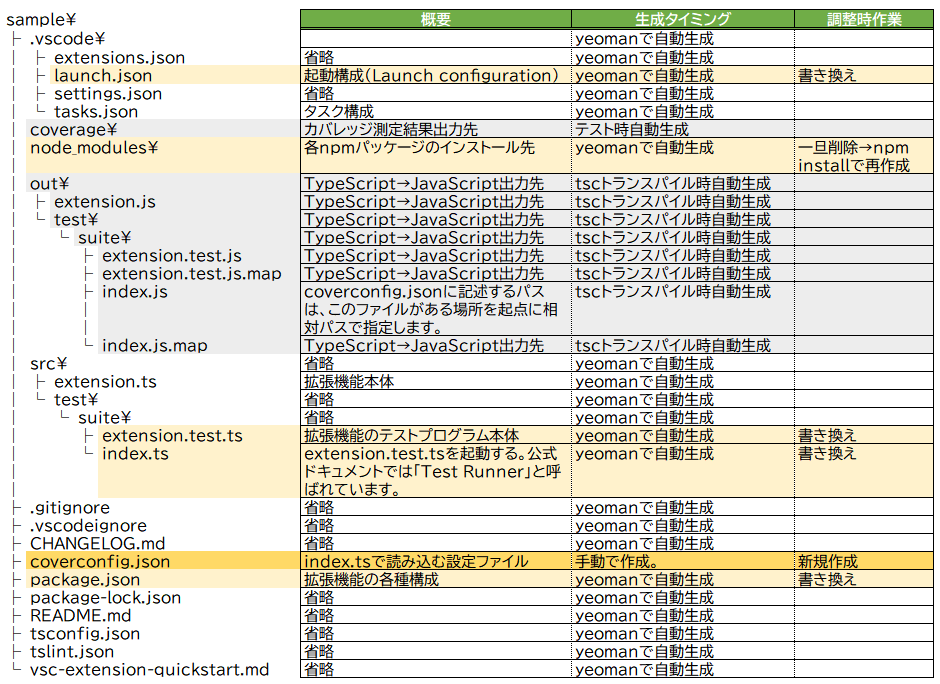
Which package manager to use?→「npm」を選択生成直後は、下記のファイル構成になります。
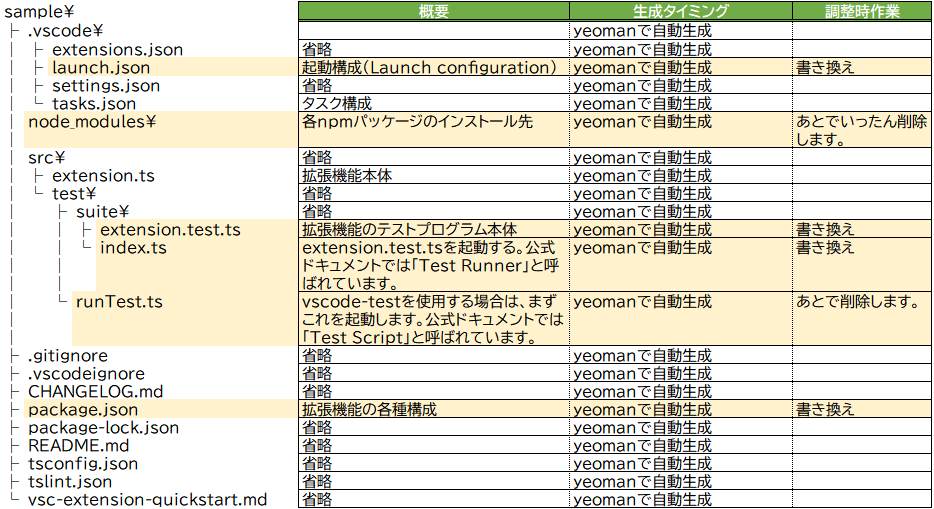
テンプレート生成直後ではカバレッジ測定なども行えないため、以降の手順で調整していきます。
調整前の内容は、最後の「脚注(テンプレート生成直後の調整前のソース一覧)」に記載しています。
この作業は下記サイトを参考にしました。
VSCode extension code coverage · Roman Peshkov
extension.test.tsファイルの調整
(調整前のextension.test.tsはこちら)
拡張機能の本体であるextension.tsをテストするテストプログラムです。
下記のように調整します。
import * as assert from 'assert';
import * as mocha from 'mocha';    //①

// You can import and use all API from the 'vscode' module
// as well as import your extension to test it
import * as vscode from 'vscode';
import * as myExtension from '../../extension';     //②

describe('Extension Test Suite', () => {    //①
  before(() => {
    vscode.window.showInformationMessage('Start all tests.');
  });

  it('Sample test', () => {    //①
    assert.equal(-1, [1, 2, 3].indexOf(5));
    assert.equal(-1, [1, 2, 3].indexOf(0));
  });
});
①テンプレートそのままでは、mochaのTDD記法とBDD記法が混ざっていて無駄に複雑になっているので、BDD記法に統一します。
②extension.tsの読み込みがコメントアウトされているので、有効化します。
なお、このテストプログラムはあくまでサンプルのため、extension.tsの処理を呼び出していません。
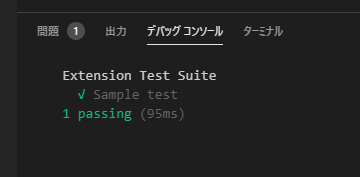
実行すると、とりあえずassertが成功し、「テストが1件成功しました」というメッセージが表示されます。
index.tsファイルの調整
(調整前のindex.tsはこちら)
GUIから起動されるindex.tsは「Test Runner」と呼ばれ、テストプログラムを呼び出す役割を持っています。
これを下記のように書き換えます。
'use strict';

declare var global: any;

/* tslint:disable no-require-imports */

import * as fs from 'fs';
import * as glob from 'glob';
import * as paths from 'path';

const istanbul = require('istanbul');
const Mocha = require('mocha');
const remapIstanbul = require('remap-istanbul');

// Linux: prevent a weird NPE when mocha on Linux requires the window size from the TTY
// Since we are not running in a tty environment, we just implementt he method statically
const tty = require('tty');
if (!tty.getWindowSize) {
  tty.getWindowSize = (): number[] => {
    return [80, 75];
  };
}

let mocha = new Mocha({
  ui: 'bdd',
  color: true,  //①
});

function configure(mochaOpts: any): void {
  mocha = new Mocha(mochaOpts);
}
exports.configure = configure;

function _mkDirIfExists(dir: string): void {
  if (!fs.existsSync(dir)) {
    fs.mkdirSync(dir);
  }
}

function _readCoverOptions(testsRoot: string): ITestRunnerOptions | undefined {
  const coverConfigPath = paths.join(testsRoot, '..', '..', '..', 'coverconfig.json');  //②
  if (fs.existsSync(coverConfigPath)) {
    const configContent = fs.readFileSync(coverConfigPath, 'utf-8');
    return JSON.parse(configContent);
  }
  return undefined;
}

function run(testsRoot: string, clb: any): any {
  // Read configuration for the coverage file
  const coverOptions = _readCoverOptions(testsRoot);
  if (coverOptions && coverOptions.enabled) {
    // Setup coverage pre-test, including post-test hook to report
    const coverageRunner = new CoverageRunner(coverOptions, testsRoot);
    coverageRunner.setupCoverage();
  }

  // Glob test files
  glob('**/**.test.js', { cwd: testsRoot }, (error, files): any => {
    if (error) {
      return clb(error);
    }
    try {
      // Fill into Mocha
      files.forEach((f): Mocha => mocha.addFile(paths.join(testsRoot, f)));
      // Run the tests
      let failureCount = 0;

      mocha.run()
        .on('fail', () => failureCount++)
        .on('end', () => clb(undefined, failureCount)
      );
    } catch (error) {
      return clb(error);
    }
  });
}
exports.run = run;

interface ITestRunnerOptions {
  enabled?: boolean;
  relativeCoverageDir: string;
  relativeSourcePath: string;
  ignorePatterns: string[];
  includePid?: boolean;
  reports?: string[];
  verbose?: boolean;
}

class CoverageRunner {

  private coverageVar: string = '$$cov_' + new Date().getTime() + '$$';
  private transformer: any = undefined;
  private matchFn: any = undefined;
  private instrumenter: any = undefined;

  constructor(private options: ITestRunnerOptions, private testsRoot: string) {
    if (!options.relativeSourcePath) {
      return;
    }
  }

  public setupCoverage(): void {
    // Set up Code Coverage, hooking require so that instrumented code is returned
    const self = this;
    self.instrumenter = new istanbul.Instrumenter({ coverageVariable: self.coverageVar });
    const sourceRoot = paths.join(self.testsRoot, self.options.relativeSourcePath);

    // Glob source files
    const srcFiles = glob.sync('**/**.js', {
      cwd: sourceRoot,
      ignore: self.options.ignorePatterns,
    });

    // Create a match function - taken from the run-with-cover.js in istanbul.
    const decache = require('decache');
    const fileMap: any = {};
    srcFiles.forEach((file) => {
      const fullPath = paths.join(sourceRoot, file);
      fileMap[fullPath] = true;

      // On Windows, extension is loaded pre-test hooks and this mean we lose
      // our chance to hook the Require call. In order to instrument the code
      // we have to decache the JS file so on next load it gets instrumented.
      // This doesn't impact tests, but is a concern if we had some integration
      // tests that relied on VSCode accessing our module since there could be
      // some shared global state that we lose.
      decache(fullPath);
    });

    self.matchFn = (file: string): boolean => fileMap[file];
    self.matchFn.files = Object.keys(fileMap);

    // Hook up to the Require function so that when this is called, if any of our source files
    // are required, the instrumented version is pulled in instead. These instrumented versions
    // write to a global coverage variable with hit counts whenever they are accessed
    self.transformer = self.instrumenter.instrumentSync.bind(self.instrumenter);
    const hookOpts = { verbose: false, extensions: ['.js'] };
    istanbul.hook.hookRequire(self.matchFn, self.transformer, hookOpts);

    // initialize the global variable to stop mocha from complaining about leaks
    global[self.coverageVar] = {};

    // Hook the process exit event to handle reporting
    // Only report coverage if the process is exiting successfully
    process.on('exit', (code: number) => {
      self.reportCoverage();
      process.exitCode = code;
    });
  }

  /**
   * Writes a coverage report.
   * Note that as this is called in the process exit callback, all calls must be synchronous.
   *
   * @returns {void}
   *
   * @memberOf CoverageRunner
   */
  public reportCoverage(): void {
    const self = this;
    istanbul.hook.unhookRequire();
    let cov: any;
    if (typeof global[self.coverageVar] === 'undefined' || Object.keys(global[self.coverageVar]).length === 0) {
      console.error('No coverage information was collected, exit without writing coverage information');
      return;
    } else {
      cov = global[self.coverageVar];
    }

    // TODO consider putting this under a conditional flag
    // Files that are not touched by code ran by the test runner is manually instrumented, to
    // illustrate the missing coverage.
    self.matchFn.files.forEach((file: any) => {
      if (cov[file]) {
        return;
      }
      self.transformer(fs.readFileSync(file, 'utf-8'), file);

      // When instrumenting the code, istanbul will give each FunctionDeclaration a value of 1 in coverState.s,
      // presumably to compensate for function hoisting. We need to reset this, as the function was not hoisted,
      // as it was never loaded.
      Object.keys(self.instrumenter.coverState.s).forEach((key) => {
        self.instrumenter.coverState.s[key] = 0;
      });

      cov[file] = self.instrumenter.coverState;
    });

    // TODO Allow config of reporting directory with
    const reportingDir = paths.join(self.testsRoot, self.options.relativeCoverageDir);
    const includePid = self.options.includePid;
    const pidExt = includePid ? ('-' + process.pid) : '';
    const coverageFile = paths.resolve(reportingDir, 'coverage' + pidExt + '.json');

    // yes, do this again since some test runners could clean the dir initially created
    _mkDirIfExists(reportingDir);

    fs.writeFileSync(coverageFile, JSON.stringify(cov), 'utf8');

    const remappedCollector = remapIstanbul.remap(cov, {
      warn: (warning: any) => {
        // We expect some warnings as any JS file without a typescript mapping will cause this.
        // By default, we'll skip printing these to the console as it clutters it up
        if (self.options.verbose) {
          console.warn(warning);
        }
      }
    });

    const reporter = new istanbul.Reporter(undefined, reportingDir);
    const reportTypes = (self.options.reports instanceof Array) ? self.options.reports : ['lcov'];
    reporter.addAll(reportTypes);
    reporter.write(remappedCollector, true, () => {
      console.log(`reports written to ${reportingDir}`);
    });
  }
}元のindex.tsは配下の各テストプログラムを呼び出すだけでしたが、上記の様に書き換えることで、istanbulを利用しカバレッジ計測ができるようになります。
引用元のサイトに記載のものは、すでに非推奨になったコードも含まれていたため、一部手を加えています。(①の箇所)
41行目の②は、このindex.tsが使用する設定ファイル(coverconfig.json)へのパスです。
トランスパイルで出力されたindex.jsを起点とした相対パスを指定します。
とりあえずそのままコピペすれば動くはずです。
coverconfig.jsonファイルの作成
index.tsで読み込む設定ファイルです。
開発環境の作業フォルダの直下に新規作成します。
{
  "enabled": true,
  "relativeSourcePath": "../..",
  "relativeCoverageDir": "../../../coverage",
  "ignorePatterns": [
      "**/node_modules/**"
  ],
  "includePid": false,
  "reports": [
      "html",
      "lcov",
      "text-summary"
  ],
  "verbose": false
}
カバレッジ測定結果の出力先などを定義しています。
こちらも相対パスで指定する必要があるため、分かりにくいので注意してください。
| 名称 | 概要 |
|---|---|
relativeSourcePath | テストしたいjsファイルが格納されているフォルダを指定します。 トランスパイル後の index.jsのある場所を起点にして、相対パスで指定します。テンプレートのフォルダ構成だと、テストプログラムも一緒にカバレッジ測定してしまいますが、とりあえずは動くので目をつぶります。 |
relativeCoverageDir | カバレッジ測定結果のHTMLファイルの出力先を指定します。 トランスパイル後の index.jsのある場所を起点にして、相対パスで指定します。とりあえずそのままコピペすれば動くはずです。 |
launch.jsonファイルの調整
(調整前のlaunch.jsonはこちら)launch.jsonを下記のように書き換えます。
{
  "version": "0.2.0",
  "configurations": [
    {
      "name": "Run Extension",
      "type": "extensionHost",
      "request": "launch",
      "runtimeExecutable": "${execPath}",
      "args": [
        "--extensionDevelopmentPath=${workspaceFolder}"
      ],
      "outFiles": [
        "${workspaceFolder}/out/**/*.js"
      ],
      "preLaunchTask": "npm: watch"
    },
    {
      "name": "Extension Tests",
      "type": "extensionHost",
      "request": "launch",
      "runtimeExecutable": "${execPath}",
      "args": [
        "--extensionDevelopmentPath=${workspaceFolder}",
        "--extensionTestsPath=${workspaceFolder}/out/test/suite"
      ],
      "outFiles": [
        "${workspaceFolder}/out/test/**/*.js"
      ],
      "preLaunchTask": "npm: watch"
    }
  ]
}
"name": "Run Extension"要素のブロックは今回使いません。"name": "Extension Tests"要素のブロックの--extensionTestsPathを、以下のように書き換えています。
このオプションには、トランスパイル後のindex.jsが格納されるフォルダへのパスを指定しますが、テンプレート生成直後の状態では最後にindexがついており、どのパターンでもうまくVSCodeインスタンスが起動しません。
(他の解説でも、全部このようなパス指定になっているんですけどね・・・)
--extensionTestsPath=${workspaceFolder}/out/test/suite/index
↓--extensionTestsPath=${workspaceFolder}/out/test/suite
package.jsonファイルの調整
(調整前のpackage.jsonはこちら)package.jsonを下記のように書き換えます。
{
  "name": "sample-ex-org",
  "displayName": "sample_ex_org",
  "description": "",
  "version": "0.0.1",
  "engines": {
    "vscode": "^1.40.0"
  },
  "categories": [
    "Other"
  ],
  "activationEvents": [
    "onCommand:extension.helloWorld"
  ],
  "main": "./out/extension.js",
  "contributes": {
    "commands": [
      {
        "command": "extension.helloWorld",
        "title": "Hello World"
      }
    ]
  },
  "scripts": {
    "vscode:prepublish": "npm run compile",
    "compile": "tsc -p ./",
    "watch": "tsc -watch -p ./",
    "pretest": "npm run compile"
  },
  "devDependencies": {
    "@types/glob": "^7.1.1",
    "@types/mocha": "^5.2.6",
    "@types/node": "^10.12.21",
    "decache": "^4.5.1",
    "glob": "^7.1.6",
    "istanbul": "^0.4.5",
    "mocha": "^6.1.4",
    "remap-istanbul": "^0.13.0",
    "tslint": "^5.12.1",
    "typescript": "^3.3.1",
    "vscode": "^1.1.34"
  }
}vscode-testを用いたrunTest.tsから起動するパターンのテスト構成になっているため、scripts要素から"test": "node ./out/test/runTest.js"を削除します。
また、devDependencies要素に必要なnpmパッケージを追加・削除します。vscode-testモジュールも使用しないので削除し、代わりにvscodeモジュールを追加します。
またそれに伴い、@types/vscodeも削除します。
npmパッケージの再インストール
package.jsonを編集したので、いったんnpm_modulesフォルダを削除して、各npmパッケージをインストールし直します。
npm installrunTest.tsファイルの削除
今回は使用しないため、見出しの通りrunTest.tsファイルを削除します。
TypeScriptのトランスパイル
上記が全部完了したら、TypeScriptのトランスパイルを実行します。
すでにoutフォルダが生成されているときは、念の為、一旦削除してください。
tsc -p ./outフォルダに必要なJavaScriptファイルが出力されます。
調整作業後の確認
これでテストを実行する準備が整いました。
最終的には下記のような構成になります。
行った作業をまとめると、
launch.json、index.ts、package.json、extension.test.tsを編集coverconfig.jsonを新規作成runTest.tsを削除node_modulesフォルダを削除→npm installで再生成- TypeScriptのトランスパイルを実行し、
outフォルダを生成
となります。coverageフォルダはこの後のテスト実行で生成されます。
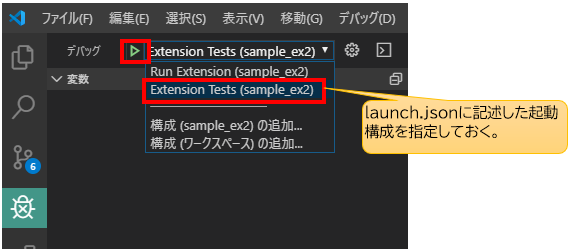
テストの実行
デバッグサイドバーの「デバッグ開始」ボタンを使用します。
テストが実行され、
カバレッジ測定結果がcoverageフォルダにHTMLで出力されます。
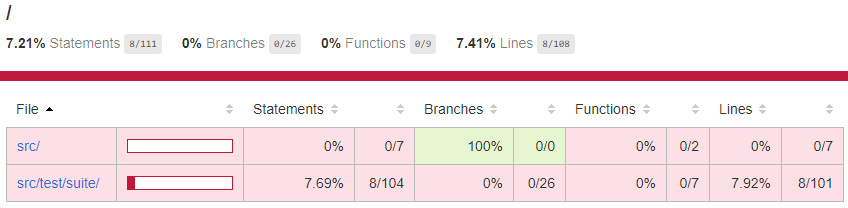
これでカバレッジ測定が可能なテスト環境が構築できました。
あとはテストをextension.test.tsに書いていきます。
補足的な話
runTest.tsとは?
公式ドキュメントでは、「Test Script」と呼ばれています。
本稿では本ファイルは削除しますが、最近のVSCode拡張機能のテストはrunTest.tsでvscode-testを用いてVSCodeインスタンスを起動してテストを実行します。
仕組みとしては、Nodeのchild_process.spawnSync()関数でVSCodeの実行ファイルに起動をかけ、runTest.tsの子プロセスとしてVSCodeインスタンスを起動します。
このときさらに、コード内でvscode-testに用意された機能を使うと、任意のバージョンのVSCodeをダウンロードして、そこの実行ファイル(Code.exe)に対して起動をかけることも出来ます。
これにより、バージョンを指定したVSCode上でテストを行うことができテスト環境を柔軟に構築することが出来るようになります。
またさらに、VSCodeインスタンスを起動する前に、他の拡張機能のインストールを指定することもできるため、特定の拡張機能がインストールされたVSCodeインスタンスを生成することも出来ます。
(ちなみに、ダウンロードしてきたVSCodeは、開発環境の.vscode-testフォルダに保存されます)
launch.jsonやCLIで単純に起動パラメータを指定して実行するよりも、より柔軟で統合的なテストが行えます。
runTest.tsでテストするときの注意
このように便利なvscode-testを用いたテストですが、実は制限もあり、同一PC上でVSCodeインスタンスを起動することが出来ません。
本末転倒のようですが、普通に「タスクの実行」やデバッグサイドバーからrunTest.tsを実行しようとすると、「Running extension tests from the command line is currently only supported if no other instance of Code is running.」とエラーが表示され、起動することが出来ません。
エラーメッセージの通り、CLIからは確かに起動できるのですが、それでも他にVSCodeが立ち上がっていると同じエラーで起動することが出来ません。
このため、テスト実行をするたびに毎回、今開発に使用しているVSCodeを終了させる必要があります。
これを解決する方法もあるにはあります。
VSCodeには、標準のVSCode以外にInsiderバージョンというものがあります。
このバージョンからrunTest.tsに「タスクの実行」やデバッグサイドバーから起動をかけると、テストを実行することができます。
runTest.ts内でダウンロードするVSCodeは標準のVSCodeのため、Insiderバージョンとは違うアプリと認識され、起動ができるようです。
拡張機能の開発のためにわざわざInsiderバージョンをインストールして使用しないといけないなんて、あまりに本末転倒すぎてにわかに信じられないのですが、本当にこの理解であっているのか誰か教えていただけると嬉しいです。
あくまでCI上で動かすことを想定しているが故の制限なんですかね・・・。
テスト起動時のTypeScriptのトランスパイル
yeomanからテンプレート環境を生成時は、テスト実行前に自動で「tsc -watch -p ./」が実行されます。launch.json内の"preLaunchTask": "npm: watch"でpackage.json上の「"watch": "tsc -watch -p ./"」が起動されるためです。
ただ、おそらくインクリメンタルコンパイルしていて、うまくテストが動かないときがあるので、テスト起動前には普通に「tsc -p ./」を実行するほうが無難です。
(これに、メチャクチャハマりました…)
テストにブレークポイントを張りたい
本稿の方法だと、テストプログラム(extension.test.tsの方)には、ブレークポイントが効いてくれません。
そこで、下記のようにdebuggerを仕込むことで、テストプログラムを途中で止めてステップ実行することが出来るようになります。
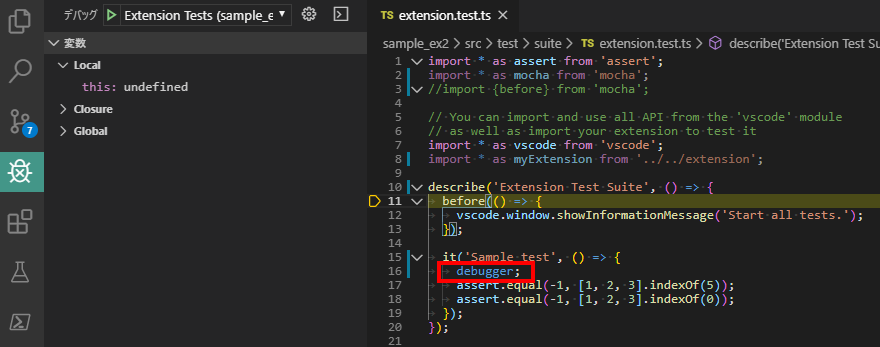
本来は、package.jsonにオプションを指定したりするようなのですが、私が試したときはうまくいかなかったので、このやり方のほうが確実です。
引用元・参考一覧
istanbulを用いた具体的なテスト構成の構築方法
VSCode extension code coverage · Roman Peshkov
(公式ドキュメント)VSCodeの拡張機能用テスト方法の説明
Testing Extension | Visual Studio Code Extension API
(公式ドキュメント)VSCodeのデバッグ方法。拡張機能の開発には特化していませんが、リモートデバッギングの話とかも載っています。
Debugging in Visual Studio Code
(公式ドキュメント)launch.jsonの各パラメータに指定する変数一覧。パス指定で迷子になったときに…。
Visual Studio Code Variables Reference
runTest.tsって何者?というStack Overflow上の質問です。runTest.ts(Test Script)とindex.ts(Test Runner)の役割の違いが、公式ドキュメントだけではよくわからないため、stackoverflowにも質問が上がっていました。
javascript – runTest.ts class in vscode-test setup gets never used even in example project, what is it’s use? – Stack Overflow
vscode-testがVSCodeインスタンスを子プロセスで生成するプロセスについて参考
node の spawn に関して調べてみた
node の spawn に関して調べてみた その2
脚注(テンプレート生成直後の調整前のソース一覧)
テンプレート生成直後のextension.test.ts
調整前のテンプレート生成直後のextension.test.tsです。
import * as assert from 'assert';
import { before } from 'mocha';

// You can import and use all API from the 'vscode' module
// as well as import your extension to test it
import * as vscode from 'vscode';
// import * as myExtension from '../extension';

suite('Extension Test Suite', () => {
  before(() => {
    vscode.window.showInformationMessage('Start all tests.');
  });

  test('Sample test', () => {
    assert.equal(-1, [1, 2, 3].indexOf(5));
    assert.equal(-1, [1, 2, 3].indexOf(0));
  });
});テンプレート生成直後のindex.ts
調整前のテンプレート生成直後のindex.tsです。
import * as path from 'path';
import * as Mocha from 'mocha';
import * as glob from 'glob';

export function run(): Promise<void> {
  // Create the mocha test
  const mocha = new Mocha({
    ui: 'tdd',
  });
  mocha.useColors(true);

  const testsRoot = path.resolve(__dirname, '..');

  return new Promise((c, e) => {
    glob('**/**.test.js', { cwd: testsRoot }, (err, files) => {
      if (err) {
        return e(err);
      }

      // Add files to the test suite
      files.forEach(f => mocha.addFile(path.resolve(testsRoot, f)));

      try {
        // Run the mocha test
        mocha.run(failures => {
          if (failures > 0) {
            e(new Error(`${failures} tests failed.`));
          } else {
            c();
          }
        });
      } catch (err) {
        e(err);
      }
    });
  });
}テンプレート生成直後のlaunch.json
調整前のテンプレート生成直後のlaunch.jsonです。
// A launch configuration that compiles the extension and then opens it inside a new window
// Use IntelliSense to learn about possible attributes.
// Hover to view descriptions of existing attributes.
// For more information, visit: https://go.microsoft.com/fwlink/?linkid=830387
{
  "version": "0.2.0",
  "configurations": [
    {
      "name": "Run Extension",
      "type": "extensionHost",
      "request": "launch",
      "runtimeExecutable": "${execPath}",
      "args": [
        "--extensionDevelopmentPath=${workspaceFolder}"
      ],
      "outFiles": [
        "${workspaceFolder}/out/**/*.js"
      ],
      "preLaunchTask": "npm: watch"
    },
    {
      "name": "Extension Tests",
      "type": "extensionHost",
      "request": "launch",
      "runtimeExecutable": "${execPath}",
      "args": [
        "--extensionDevelopmentPath=${workspaceFolder}",
        "--extensionTestsPath=${workspaceFolder}/out/test/suite/index"
      ],
      "outFiles": [
        "${workspaceFolder}/out/test/**/*.js"
      ],
      "preLaunchTask": "npm: watch"
    }
  ]
}テンプレート生成直後のpackage.json
調整前のテンプレート生成直後のpackage.jsonです。
{
  "name": "sample-ex-org",
  "displayName": "sample_ex_org",
  "description": "",
  "version": "0.0.1",
  "engines": {
    "vscode": "^1.40.0"
  },
  "categories": [
    "Other"
  ],
  "activationEvents": [
    "onCommand:extension.helloWorld"
  ],
  "main": "./out/extension.js",
  "contributes": {
    "commands": [
      {
        "command": "extension.helloWorld",
        "title": "Hello World"
      }
    ]
  },
  "scripts": {
    "vscode:prepublish": "npm run compile",
    "compile": "tsc -p ./",
    "watch": "tsc -watch -p ./",
    "pretest": "npm run compile",
    "test": "node ./out/test/runTest.js"
  },
  "devDependencies": {
    "@types/glob": "^7.1.1",
    "@types/mocha": "^5.2.6",
    "@types/node": "^10.12.21",
    "@types/vscode": "^1.40.0",
    "glob": "^7.1.4",
    "mocha": "^6.1.4",
    "typescript": "^3.3.1",
    "tslint": "^5.12.1",
    "vscode-test": "^1.0.2"
  }
}
本記事は、チームスピリット Advent Calendar 2019に投稿した記事を加筆・再編集したものです。
TeamSpirit Advent Calendar Day13:Visual Studio Code拡張機能のテスト環境を構築する